Woven by Grace: Home
Image and video hosting by TinyPic
Showing posts with label Home. Show all posts

Wednesday, October 18, 2017

In this Season: New Surprises & Family Moments


Though I took an unexpected break from blogging, it has definitely still been in the forefront of my mind. Being able to share and record life in a unique way is a big piece of my heart and I'm so grateful to be back (hopefully for much longer). Well much has happened! Lots of growth, changes, challenges, but oh so many triumphs. The ones that humble you and remind you that God is working ever so sweetly in your life to make you better. 

As you can see the boys have grown! And their personalities are something for short stories and live television for sure...especially Titus. They are so much fun, so much that we are having our THIRD BOY in February! Yes, you read that right...our THIRD BOY ha! I can't say that Mike and I weren't hoping for a girl (so much he thinks we should try one more time...), but my heart truly is at peace and full of excitement. 

We had the opportunity recently to do a family photo session with one of my absolute favorite photographers and close friend from Uplifted Photography! I cannot even describe how I feel looking at our family in this new season. Thank you as always Bri for capturing us so perfectly, and sweet baby boy before his arrival!


Tuesday, January 17, 2017

Our Nest: Do's & Don'ts when knee deep in Thrifting


Remember when going to the thrift store was a bad thing? I remember those days, until I hit college and a friend of mine told me all of the great clothes she found at our local thrift! All of the sudden I realized I could look fairly decent AND save the little money I had haha. Once we moved into our home I really started to get into thrifting as my old job had a Goodwill right next to it.

I've had so many great finds, and definitely some terrible ones. Following professional thrifters like Amanda Rydell, I'm constantly wishing I could find a crushed velvet couch or the perfect set of vintage quilts. However, in spite of how much I love thrifting and the thrill of finding a great deal, over the years I've learned a few things that I hope will help you on your next hunt!

1. Browse around.
    Jumping on the first thing you see sometimes isn't always the best. When I thrift I browse the entire store and place items in my cart, though I may not keep them. It's always better to see what's around before settling on just one thing. I've found the same, a similar, or even a better find by simply looking around! 

2. Go frequently! 
    This is tricky, because you don't always have time to thrift. But I have found that going at least twice a week to your local thrift stores and shops make a difference in finding great deals! Since the best and worst part about thrift shops is they aren't like Target or other stores with consistent and abundant merchandise. So items come are constantly scarce and on heavy rotation. Going on a regular basis helps to offset missing something new. 

3. Do NOT overlook Quality!
    I've made this mistake too many times when thrifting and it's not worth it! Inspect your items, especially if it's a furniture piece. Knowing that you're not purchasing something brand new does not mean you have to sacrifice its quality. Some of our best furniture pieces are vintage thrifts, but I've learned to make sure there isn't any significant damage I cannot repair. I remember purchasing chairs that would need new cane webbing. I ended up tossing them, because the repair cost 3 times more than what I paid for the chairs. So in short - the best deals are the ones that are worth the purchase!


Saturday, January 14, 2017

Our Nest: From Joseph's Colored Coat to Home

Purchasing a home was one of the greatest moments I've experienced in our financial journey. From being denied the first opportunity to purchase, to receiving the keys to your first place is something I hold dear to my heart. When we first stumbled upon our home it was completely unexpected, but Mike and I both knew that this would be where we settled in for sure. However, I wish I had the skills of Chip & Joanna Gaines when we moved in - but I have an eye for seeing the beauty behind most things!

This is long overdue, because if you've been to my home you know what as soon as we moved in within the weekend I had repainted the majority of the house (I don't recommend it). I'm know that pure adrenaline and the help of friends who appease my crazy antics made it all possible in such a timely manner. This is no exaggeration, but our house was about SIX different colors when we moved in. Doors were missing, walls were damaged, and the story goes that the previous renters (it was a rental property prior to our purchase) would rescue dogs and cats...totaling to about 13 animals who inhabited the home with free reign. Take a deep moment and pause...13. My eyes water thinking about it, and my skin itches if I could tell you how much we've cleaned out since then. But I digress, because the best part is how it looks now! So here is what we moved in to 2 years ago:

The main floor was a powder blue leading into the kitchen which was a tiffany blue. The ceiling is still an off white as I realized over time that it too was blue at one point... However, this is what it our living room looks like today!

It's most certainly an improvement! We are looking forward to stripping and re-staining the floors in the future along with this upcoming week we change out the banister! Can't wait to show you all that either. 

Moving into the kitchen...oh man the kitchen. With the original cabinets, faux marble counter tops, and old light fixtures it was quite the sight. I love the openness of the area, as the previous home owner had actually vaulted the ceilings (not common in the other homes in the area) and placed a beautiful skylight. These were huge selling points for us. So take a good look at before:
And this is AFTER! 

The boys were able to find a spot during my photos of course! I took on the task of redoing the cabinets myself with a homemade version of chalk paint. It's the same I used in this tutorial here. I eventually did touch up the cabinets this year with actual cabinet paint to help keep them durable and clean. New hardware on the cabinets pulled in the stainless steel look from the appliances. Also we had someone redo the backsplash and countertop as well as replacing the sink. I plan to get a few more copper items to offset the new and old look that I love. Also I will be redoing our coffee cart in the near future so stay tuned!

As much as I love home makeovers I honestly advise that you TAKE YOUR TIME. Over the last two years Mike and I have gone through a cycle of saving and changing items little by little. We made a list of prioritized areas in the home to fix and have knocked them off our list one by one. Each project takes time to find the right contractor and materials - trust me we've had some challenges with contractors! So set a realistic deadline and count your costs! It's worth it.

Tuesday, August 9, 2016

The Nest: Finding Your Design Voice

I LOVE HGTV! I truly have a deep spot in my heart for all the things Fixer Upper, Listed Sisters, and The Property Brothers come up with on a weekly basis. If you're anything like me, as inspiring as those shows can be - they can leave you feeling like "well my house is crap!" Sometimes I have to take a break from binge watching so I don't rip open a new wall or take down all my wall sconces for new ones. BUT as much as I love and admire the design skills of each of those and so many others - I'm most challenged to find my own design voice and what speaks to who I am.

Mike said something so profound to me the other day as we watched FixerUpper, "it's not that their style is so unique and out of this world, what we're most inspired by is the freedom they have to express who they are and their brand." And it clicked! That's exactly what I love about all of them! Over the last several years as I've rearranged and rearranged my house I think there are 3 things you can use as guidelines in finding the freedom in your voice as well.

1. Learn your favorite color story: This is vastly different than your favorite color. Look around your house, we often subconsciously purchase certain colors in our furniture, accents, and central pieces. As you begin to pin down those colors, start putting together complimentary and accent colors that go around them. In my house I love neutrals, BUT I realize that teal is a common color in almost all areas of my house. From my living room to my basement you see that color along with other variations of it. So what's yours? Start there and use a color wheel to begin weaving that together!

2. Stay true to YOU, not the trends! See that there? Those are tons of pallets for the pallet wall we insisted we needed. Until we realized it wasn't "us." There are so many trends that look wonderful in other homes, but may make no sense in your home. So be careful! Just because Design Love Fest has gorgeous white couches, doesn't mean that's for you and the toddlers in your home. Trends aren't sensible, their trends. Be selective, home decor and style cost money...which leads to my last guideline.

3. Plan THEN Complete. Splurging can be awesome, being sponsored is phenomenal, but most people do not have those two factors just lying around at their disposal. So PLAN! Which is why knowing your color story is key. You will be so surprised that many of the looks you want to achieve you already have most of the items in your home! Sometimes deconstructing a room allows for you to reconstruct another. I will buy something that I think is awesome for my kitchen, but then ends up in our bedroom. For someone like me who doesn't like planning, I've found this is a guideline I have to stick to if I want to achieve the look I'm aspiring for. Being patient during the completion process also helps my pockets if you know what I mean. 

Be inspired not discouraged. Flip through Pinterest and pin down those items you love! Create your board, look at your current color story, and IMPROVE it! Express your unique style the best way possible and I promise you'll feel like a million bucks. People will walk in your home and LOVE it as much as you do! 

Friday, March 27, 2015

Our Nest: Refinishing Furniture

I still can't believe that it's almost been a year since we bought our FIRST home and have settled into the feeling of permanency... you know the one where if you paint the walls you don't have to dread repainting them back once you decide to move? The other day as Mike and I were working on Kai's room (sharing that soon) we laughed as we drilled, screwed, and hammered til our hearts' content - simply because we don't have to change it unless we don't want to!

As exciting at that can be, it is most certainly overwhelming figuring out how you want your home to look. For some time I've enjoyed finding items either in thrift stores or even on the side of the road to either refurbish, re purpose, or unfortunately toss. Budgets are tricky and since currently I don't have a sponsor for home repairs (Lowe's I'm available) I've learned that purchasing quality is everything... ESPECIALLY when thrifting! As yard sale season is upon us and the thrift bug has hit many of us, I've learned many lessons about picking out quality furniture and comparing cost to quality. Though I won't cover that here I wanted to mention it, because when I stumbled upon this dresser on a "freecyle" Facebook group I'm a part of I knew I had to take a risk!


This dresser was headed to the dumpster very soon due to no space and I knew it had potential. So of course waiting "patiently" in line to see if we could scoop it up I started figuring how was I going to refinish it? I have previously dabbled with chalk paint and found it was great, but can be tough to keep from chipping, scratching, or showing signs of wear relatively fast. So with a bit more research I tested a method of my own. I adapted my chalk paint recipe from I Heart Nap Time Blog. It was a bit of trial and error, however I hope to walk you through my steps!

When refinishing furniture you want to use either a semi-gloss or satin finish. I personally prefer satin. The color I used is called "Afternoon Tea" by Valspar. You also will need to sand any loose pieces of the furniture. This was a bit tricky because I realized the dresser had laminate wood, so using the previous paint I knew would be to my advantage - but I smoothed out the peeled paint.
 

This is where you create your chalk paint mixture.I used this as my priming base for the dresser. This is an option and a great one at that instead of traditionally stripping, priming, and then painting older furniture.


Mix in approximately 3 table spoons of water - make sure that your consistency is still thick, but not runny or chunky. 


Now to add your paint. I added approximately (I eye this, I do not measure) 1-1.5 cups of paint to the mixture just created (Plaster of Paris & water). Make sure that you mix this really well. I coated the entire dresser about 2-3 times to get a true coat over the entire piece. Allow for drying between coats!


Finally after the chalk paint mixture dried, I coated the entire piece 2-3 times with the pure satin mixture of paint. This not only sealed the piece along with the finishing wax I used, it provided the shine finish that chalk paint does not. Traditionally with chalk paint you seal it with finishing wax - but I find that finishing wax is just helpful when you have kids around... I am so pleased with the results!


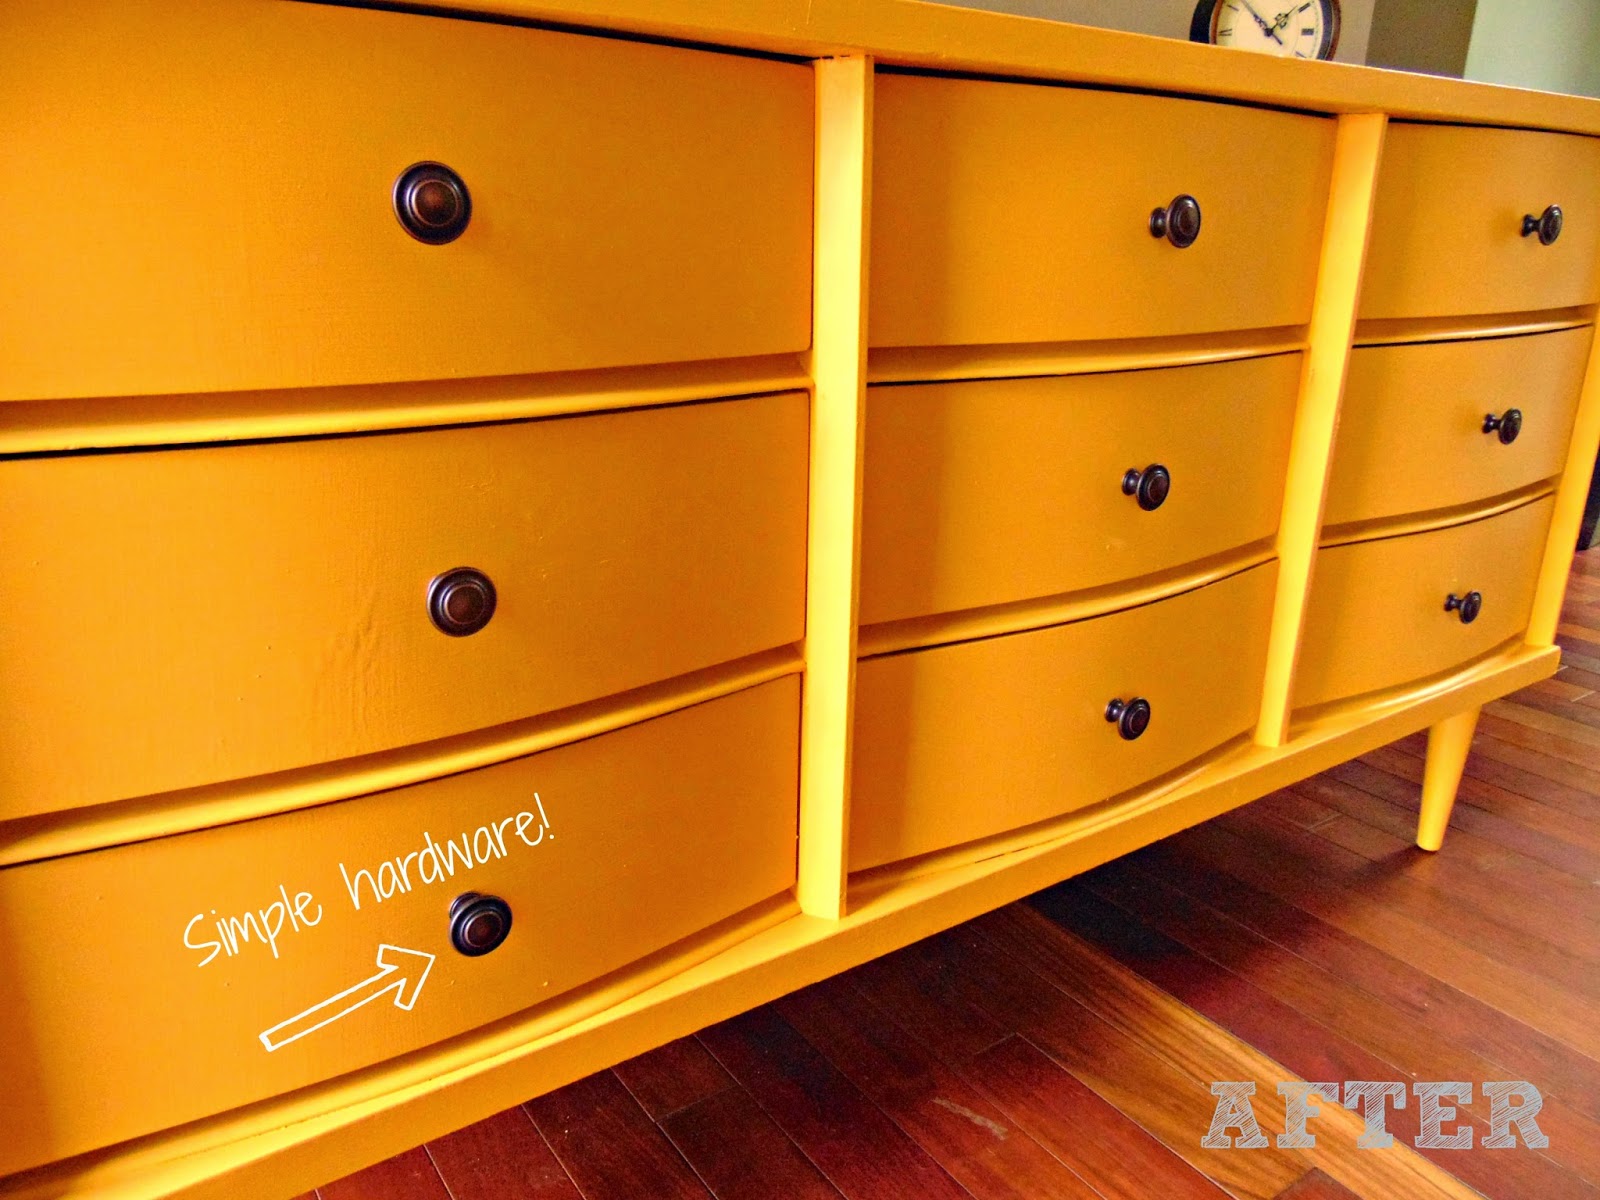
and of course the finished product!


With simple hardware and a new coat of paint, this piece is exactly what we were looking for! I hope that this helps you in future refinishing adventures with your own great finds! As always I am testing and improving what I do with each piece, so hopefully this is a step in the right direction for you and keep checking back for any new tips!


Wednesday, November 5, 2014

Organization: The Meal Plan


My most common struggle with our schedule is meal prep AND actually sitting down and eating as a family. As we've really focused on our budget and begun to make adjustments to have more time together, I finally decided to give meal planning a go. Once upon a time I was a planner...so it wasn't too horrible at least starting the process to better organize our meal time.

Several months ago I was contacted by eMeals to test out their service, however, truthfully I felt overwhelmed with the weekly list of new recipes and decided to keep a folder until I knew how to utilize them. They are a meal planning company that sends you a weekly grocery list along with a week full of recipes each week! I know I should have used them sooner - but glad I figured out a way to incorporate them!

So of course after asking the question how do you meal plan? I was given some great tips and checked out Pinterest for some inspiration. I was able to find this printable meal plan calendar:


There are so many, I wanted to keep it simple. My first plan of attack was sitting and writing out all of the recipes I do know. Then I looked at the recipe lists I've been sent from eMeals and added a few new meals along with some from Pinterest. Under each recipe I listed the ingredients so I knew what was needed when I shopped.


Then it was time to execute. I will say that my grocery bill was HIGHER than usual, but I actually felt like I had realistically shopped for my family. Kai truly doesn't like to eat out much so I knew that this was in everyone's best interest. I will say all of this was the easy part - sticking to the calendar was my true challenge....

In terms of the calendar planning part I looked at our schedule and looked at days in which I could make extra (like Wednesday for youth service) and just bring the leftovers for all of us to eat. I chose Mondays and Tuesdays as my days to be creative and did include a cheat day Friday and Saturday if we wanted to go out to eat as a family or spend time with friends.

There truly isn't any magic formula when it comes to meal planning and I used a very simple approach. I'm so excited to have some structure to what we're doing and to keep up a routine that works for us. I was less stressed coming home when cooking and I even used my crock pot!

Kai is even pleased - that's a new dish may I add!

Hope you're inspired to test out meal planning!!
 

Saturday, October 25, 2014

Our Nest: Here Comes Big Kid!

For the last several weeks I've had this slight nudging to take the big comfy chair out of Kai's room and replace it with a space of his own. This chair has been in his nursery since he was born and has soothed us both during late night nursing and sick days. I love this chair, but lately Kai has been putting himself to sleep as well as needing less time to snuggle.

Sometimes as parents we want to hold tightly with the excuse that we know what's best... and as much as I cling to that I knew that it was time for a change. Kai has always had an independent spunk to him and I've had to learn to be okay with letting him spread his wings despite my motherly fears.

So with the help of my sister and a few items she had kept from her boys, I replaced the chair with a table and a small reading chair for him.


Last night we colored (his new favorite thing) and did a few puzzles before bedtime. Of course we still read a story and went to the potty!! Because if your toddler initiates using the potty you celebrate any chance you get ha! But the space is perfect for him and so much better used than my favorite chair.

As I continue to watch him grow I'm constantly walking the tight rope of watching him spread his wings and be his safety net, but I don't want to miss these transitions and help him embrace healthy change. So as I celebrate his new space and this next phase of toddlerhood - I hope you enjoy whatever stage you're in with your little and are encouraged to walk with me side by side... cause this parenting thing is tough!